Battery switch on travel trailer function is crucial for managing your RV’s power. Understanding how these switches work – whether single, dual, or selector – is key to preventing electrical issues and maximizing your off-grid adventures. This guide will walk you through the different types, their functionalities, troubleshooting tips, and safety precautions, ensuring you’re prepared for any situation on the road.
From basic operation to advanced configurations, we’ll cover everything you need to know about your travel trailer’s battery system. We’ll delve into the inner workings of various switch types, explaining how they manage power distribution between house and chassis batteries, and highlight important safety features. We’ll also tackle common problems and offer solutions, empowering you to maintain your RV’s electrical system with confidence.
Battery Switch Types in Travel Trailers
Choosing the right battery switch for your travel trailer is crucial for managing your power sources effectively and safely. This involves understanding the different types available and their respective strengths and weaknesses. This section will break down the common types of battery switches found in RVs, explaining their internal workings and helping you make an informed decision.
Battery Switch Types and Their Internal Workings
Travel trailers typically utilize three main types of battery switches: single, dual, and selector switches. Each offers a different level of control over your battery bank.
| Switch Type | Number of Batteries | Functionality | Advantages/Disadvantages |
|---|---|---|---|
| Single Battery Switch | One | A simple on/off switch for a single battery. It connects the battery to the trailer’s electrical system or disconnects it completely. | Advantages: Simple, inexpensive, easy to install. Disadvantages: Limited functionality; only suitable for trailers with a single battery. |
| Dual Battery Switch | Two | This switch allows for independent control of two batteries. Each battery can be connected or disconnected separately, or both can be connected simultaneously. Often features a “both” or “combined” position. | Advantages: Allows for separate charging of batteries (e.g., one for house use, one for starting the tow vehicle). Disadvantages: Still relatively simple; doesn’t offer sophisticated control over power distribution. |
| Selector Switch (Multi-Battery Switch) | Two or More | This type allows selection of different battery banks or combinations thereof. It can connect one battery at a time, both batteries together, or disconnect all batteries. Some even offer a “start” position to prioritize the starting battery. | Advantages: Offers the most control and flexibility. Disadvantages: More complex, potentially more expensive, and requires more careful installation. |
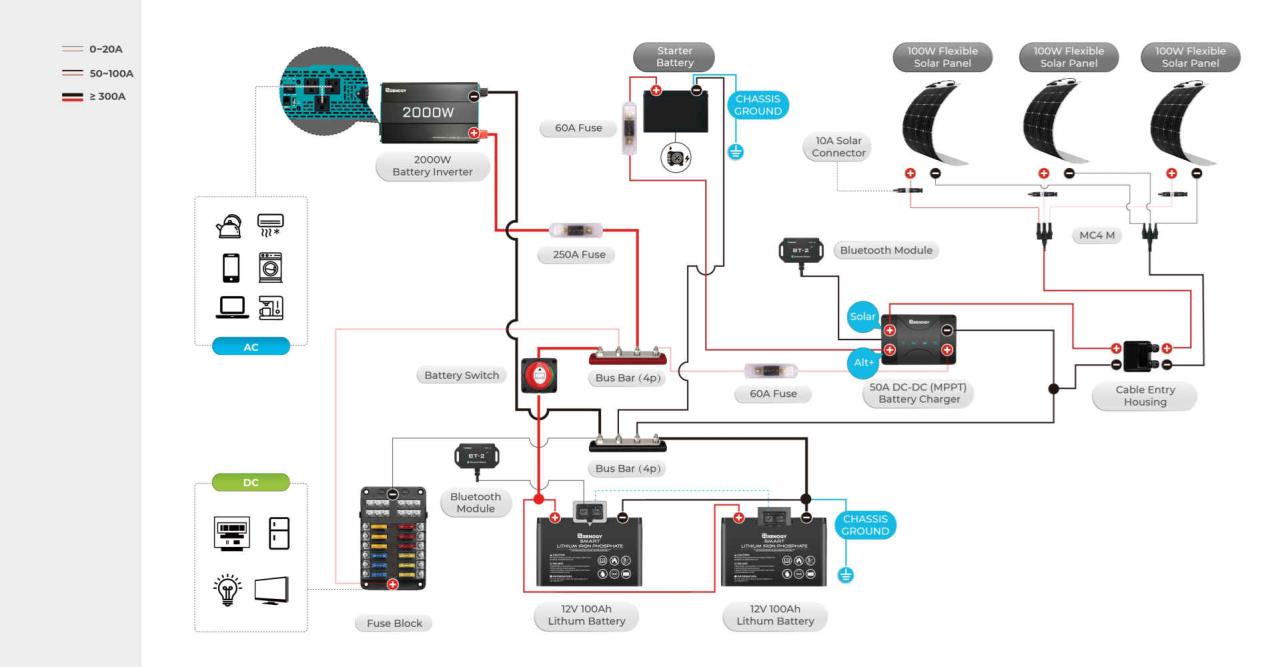
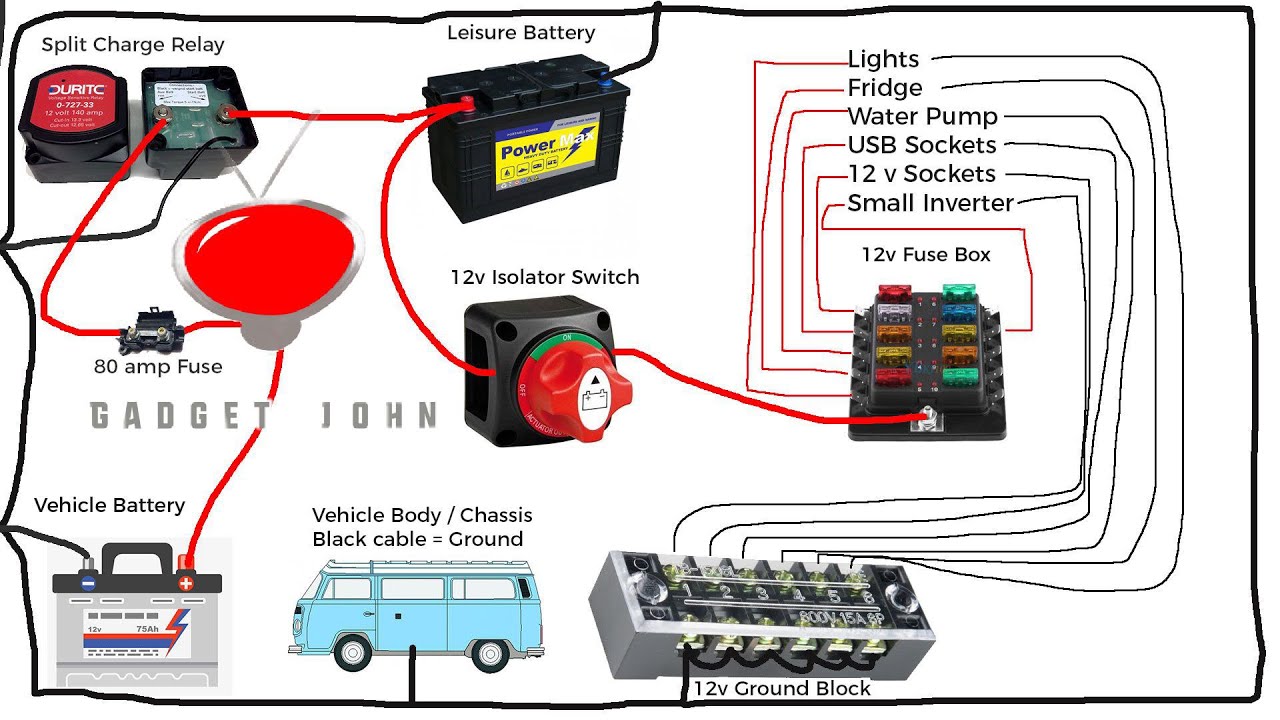
Illustrative Diagram for a Dual Battery Switch:Imagine a simple diagram. The diagram would show two batteries, each with a positive (+) and negative (-) terminal. Lines represent wires. One line from each positive terminal goes to the switch. The switch itself has three positions: “Off,” “Battery 1,” “Battery 2,” and “Both.” From the switch, a single line leads to the positive bus bar of the trailer’s electrical system.
Similar wiring exists for the negative terminals, though this is often a simpler connection directly to the chassis ground. The “Off” position disconnects both batteries; “Battery 1” connects only the first battery; “Battery 2” connects only the second battery; and “Both” connects both batteries to the system.
Battery Switch Brand Comparison
Several brands manufacture RV battery switches. A direct comparison of performance and reliability is difficult without specific testing data for each model under identical conditions. However, factors to consider when choosing a brand include the switch’s amperage rating (it should match or exceed your battery’s capacity), its construction quality (look for robust materials and a well-designed mechanism), and the manufacturer’s warranty.
Reputation and customer reviews are also valuable indicators of reliability. While some brands may be perceived as higher-end or more expensive, the crucial aspect is choosing a switch that meets your needs and is appropriately rated for your system’s power demands.
Function and Purpose of the Battery Switch
The battery switch in your travel trailer is a crucial component that controls the flow of power from your batteries to the various electrical systems in your RV. It acts as a central hub, allowing you to selectively manage power to prevent accidental drain and ensure safe operation. Understanding its function is key to maximizing your RV’s electrical system efficiency and preventing potential problems.The primary function of a battery switch is to isolate and connect your house batteries (used for interior lights, appliances, etc.) and your chassis battery (used for starting the tow vehicle’s engine).
This separation is vital. Without a switch, a drained house battery could potentially drain the chassis battery, leaving you stranded. The switch enables you to disconnect the house batteries completely when not in use, conserving power and preventing accidental discharge. Conversely, you can connect them to charge them via the tow vehicle’s alternator during travel. The switch often offers multiple positions to manage this power distribution.
A common configuration includes positions for “Both,” “Off,” “House,” and “Start.” “Both” connects both battery banks, “Off” disconnects both, “House” connects only the house batteries, and “Start” typically connects only the chassis battery (although some setups may differ slightly).
Okay, so you’re wondering about your travel trailer’s battery? Totally understandable! Knowing how to use that battery switch is key. Check out this helpful guide on the battery switch on travel trailer function to understand the basics. Then, once you’ve got that down, you might want to dive deeper into specific scenarios.
For more advanced tips and troubleshooting, another great resource is this page on battery switch on travel trailer function – it covers everything from preventing drainage to dealing with common problems. Happy camping!
Battery Switch Power Distribution Management
A typical battery switch works by using a series of heavy-duty switches to route the power from your batteries to the designated circuits. The switch itself is usually a robust, clearly labeled device, often located in a readily accessible area within the RV. When you move the switch to a specific position, it completes or breaks the electrical circuit between the batteries and the relevant components.
For instance, selecting “House” will only allow power to flow from the house battery bank to the interior lights, appliances, and other 12V systems. Selecting “Both” combines the power from both banks, allowing for longer run times of your RV systems. Selecting “Off” ensures that no power flows from either battery bank to the house systems, protecting against unintended battery drain.
Modern switches often incorporate safety features to prevent accidental switching or short circuits.
Safety Features of Modern Battery Switches
Modern battery switches often include several safety features to improve reliability and prevent accidents. Many switches are designed with a positive locking mechanism, ensuring that the switch remains in the selected position and doesn’t inadvertently change. They are also built with heavy-duty contacts and wiring to handle the high currents involved. Some newer switches even include indicators (like LED lights) to visually confirm the selected position.
These features reduce the risk of accidental power interruptions or short circuits, ensuring the safe and reliable operation of your RV’s electrical system. Proper installation by a qualified technician is also a crucial safety aspect to consider.
Troubleshooting Common Battery Switch Issues
Dealing with a malfunctioning battery switch in your travel trailer can be frustrating, but systematic troubleshooting can usually pinpoint the problem. Understanding the common causes of failure will help you efficiently restore power to your RV. This guide provides a step-by-step approach to diagnose and fix the issue.
Battery switch problems often stem from simple issues, saving you the expense of a professional repair. However, some problems may require more advanced electrical knowledge or professional assistance. Safety should always be your top priority when working with electrical systems. Always disconnect the battery before starting any repair work.
Common Causes of Battery Switch Failure
Several factors can lead to a malfunctioning battery switch. These include corrosion buildup on terminals, loose connections preventing proper electrical contact, and internal damage to the switch itself from age or excessive current draw. Less common issues could involve wiring problems or a faulty battery itself.
Corrosion is a significant culprit. The buildup of oxides on the battery terminals and switch contacts can create high resistance, hindering current flow and potentially leading to overheating. Loose connections, often caused by vibration during travel, can create intermittent power or complete failure. Internal damage within the switch mechanism, such as worn-out components, can also interrupt the circuit.
Finally, a faulty battery itself, although less likely to be directly related to the switch, can sometimes manifest as a switch problem.
Step-by-Step Troubleshooting Guide, Battery switch on travel trailer function
This guide provides a systematic approach to troubleshooting your battery switch. Follow these steps carefully, and remember to disconnect the battery’s negative terminal before starting any work.
- Visual Inspection: Begin by carefully inspecting the battery switch and its connections. Look for any signs of corrosion (green or white buildup) on the terminals and connections. Check for loose or damaged wires.
- Clean the Terminals and Connections: If corrosion is present, use a wire brush or terminal cleaner to thoroughly clean the terminals and connections. Make sure to remove all traces of corrosion. Apply a corrosion inhibitor to prevent future buildup.
- Tighten Connections: Ensure all connections are tight and secure. Loose connections are a common cause of intermittent power or complete failure. Use a wrench to tighten any loose nuts or bolts.
- Test the Switch Operation: With the connections clean and tight, attempt to operate the battery switch. If it still doesn’t function correctly, proceed to the next step.
- Check the Circuit with a Multimeter: Use a multimeter to test the continuity of the circuit. This will help you determine if the problem lies within the switch itself or elsewhere in the wiring. If there’s no continuity, the switch is likely faulty.
- Inspect Wiring: Examine the wiring leading to and from the battery switch for any signs of damage, such as cuts, fraying, or loose connections. Repair or replace any damaged wiring.
- Replace the Battery Switch: If all other steps have failed to resolve the issue, the battery switch itself may need to be replaced. This usually involves disconnecting the wires, removing the old switch, and installing a new one, ensuring proper connection.
Troubleshooting Flowchart
Imagine a flowchart. The start would be “Battery Switch Malfunction?”. The first decision point would be “Visible Corrosion or Loose Connections?”. Yes leads to “Clean and Tighten Connections,” then to “Test Switch Operation.” No leads to “Test Switch Continuity with Multimeter.” If continuity is good, it leads to “Inspect Wiring.” If continuity is bad, it leads to “Replace Battery Switch.” All “Test Switch Operation” results lead to a final decision point: “Switch Working?” Yes indicates the problem is solved; No indicates further investigation may be needed, potentially consulting a professional.
Battery Switch Installation and Maintenance
Proper installation and regular maintenance of your travel trailer’s battery switch are crucial for ensuring reliable power and extending the lifespan of your batteries and the switch itself. Neglecting these aspects can lead to premature failure, electrical issues, and potentially costly repairs. This section details best practices for installation and Artikels a simple maintenance schedule.
Battery Switch Installation
Installing a battery switch correctly is vital for safety and functionality. Improper installation can lead to electrical shorts, fire hazards, and damage to your trailer’s electrical system. Follow these steps for a safe and effective installation:
- Disconnect the Battery: Before beginning any work, always disconnect the negative terminal of your battery to prevent accidental shorts and shocks. This is the most important safety precaution.
- Choose the Location: Select a location that is easily accessible, well-ventilated, and protected from the elements. Consider proximity to the battery and your main electrical panel for ease of wiring.
- Secure Mounting: Use appropriate hardware to securely mount the switch to a sturdy surface. Ensure the switch is firmly attached and won’t vibrate loose during travel.
- Wire Connections: Connect the positive (+) battery cable to the input terminal of the switch. Run a wire from the output terminal of the switch to your trailer’s electrical panel. Ensure all connections are tight and properly insulated.
- Grounding: Connect a ground wire from the switch’s ground terminal to a suitable grounding point on the trailer’s chassis. A clean, secure ground connection is essential for safe operation.
- Reconnect the Battery: Once all connections are made and inspected, reconnect the negative battery terminal. Test the switch to ensure it functions correctly.
- Labeling: Clearly label all wires and connections to aid in future maintenance and troubleshooting. Use waterproof labels for durability.
Battery Switch Maintenance
Regular maintenance is key to preventing problems and ensuring your battery switch continues to operate reliably. A small amount of preventative maintenance goes a long way in avoiding costly repairs.
Routine inspections and cleaning are essential. Corrosion on terminals can impede electrical flow and lead to overheating. Tightening loose connections will also prevent potential issues.
Recommended Maintenance Schedule
| Maintenance Task | Frequency |
|---|---|
| Visual Inspection (corrosion, loose connections) | Monthly |
| Clean terminals with wire brush and baking soda solution | Semi-annually |
| Tighten all connections | Semi-annually |
| Apply dielectric grease to terminals | Annually |
Battery Switch and Electrical System Integration: Battery Switch On Travel Trailer Function
Your travel trailer’s battery switch is the central control point for your 12-volt DC system, acting as a crucial link between your batteries and other electrical components. Understanding its interaction with these components is vital for safe and efficient operation. This section will detail how the switch integrates with the solar panels, converter, and inverter, and its role in preventing electrical issues.The battery switch acts as a gatekeeper for the DC power flowing from your batteries.
When the switch is in the “on” position, it allows power to flow to the various appliances and systems in your trailer. Conversely, when it’s “off,” it completely isolates the batteries, preventing any drain or accidental shorts. This isolation is particularly important for long-term storage to avoid completely draining your batteries. It also plays a key role in preventing accidental short circuits, which could damage your electrical system or even cause a fire.
Battery Switch Interaction with Solar Panels
Solar panels generate DC power, which is typically fed into a charge controller before reaching your batteries. The battery switch doesn’t directly control the flow of power from the solar panels to the charge controller; the charge controller regulates this. However, the battery switch controls the flow of powerfrom* the batteries to the rest of the trailer’s 12V system. Therefore, even with solar panels charging the batteries, turning the switch to “off” prevents any discharge from the batteries to the trailer’s appliances.
This is essential for maintaining a charge in your batteries during periods of low sunlight.
Battery Switch Interaction with Converter
The converter transforms 120-volt AC power from your campsite hookup into 12-volt DC power to charge your batteries. The battery switch sits downstream from the converter; the converter charges the batteries, regardless of the battery switch position. However, the switch determines whether the charged power in the batteries is available to power your trailer’s 12-volt DC appliances.
Turning the switch “off” isolates the batteries from the 12V system, preventing them from powering lights, fans, or other DC devices, even if the converter is actively charging them.
Battery Switch Interaction with Inverter
An inverter converts 12-volt DC power from your batteries into 120-volt AC power for running AC appliances. The battery switch is critical here. When the switch is “off,” the inverter has no access to the batteries and cannot generate AC power. This prevents accidental drain on your batteries when you’re not using AC appliances and ensures the inverter does not draw power from the batteries unintentionally.
Turning the switch “on” connects the inverter to the batteries, allowing it to function normally.
Safe Battery Connection and Disconnection
Before connecting or disconnecting batteries, always ensure the battery switch is in the “off” position. This prevents sparks and potential shorts. When connecting batteries, first connect the positive (+) cable to the positive terminal, then connect the negative (-) cable to the negative terminal. When disconnecting, reverse the process, removing the negative cable first. Always use appropriate tools and wear safety glasses to protect against accidental splashes of battery acid.
Selecting the Right Battery Switch for Your Needs
Choosing the correct battery switch for your travel trailer is crucial for safe and reliable operation. An undersized switch can overheat and fail, potentially causing damage to your electrical system or even a fire. Conversely, an oversized switch is unnecessary expense. This section will guide you through selecting the appropriate switch based on your trailer’s power demands.Proper sizing depends on the total amperage draw of all devices connected to your battery bank.
This includes everything from lights and appliances to the air conditioner and water pump. You must consider both the continuous and surge currents your appliances will demand. The continuous current is the steady current draw when an appliance is running normally, while the surge current is the much higher current drawn briefly when the appliance initially turns on.
Battery Switch Amperage Ratings and Suitability
The following table compares different battery switch amperage ratings and their suitability for various battery configurations. Remember that these are guidelines, and you should always consult the manufacturer’s specifications for your specific appliances and batteries. Overestimating your amperage needs is better than underestimating, ensuring your system operates safely and efficiently.
Okay, so you’re dealing with your travel trailer’s battery, right? Understanding how the battery switch works is key. Check out this guide on the battery switch on travel trailer function for a detailed explanation. It’s super helpful for troubleshooting and preventing drain. Knowing how to properly manage your power is crucial, and this resource will get you up to speed.
For even more tips, another great site explaining the battery switch on travel trailer function offers some different perspectives and troubleshooting ideas. These resources will help you keep your RV running smoothly.
| Switch Amperage Rating | Suitable Battery Bank Size (Amp-hours) | Suitable Appliances | Notes |
|---|---|---|---|
| 50 Amps | Up to approximately 100 Ah | Basic lighting, small water pump, small refrigerator (12V) | Suitable for smaller travel trailers with limited electrical demands. |
| 75 Amps | Up to approximately 150 Ah | Lighting, larger water pump, small refrigerator (12V), small microwave | A good option for many mid-sized travel trailers. |
| 100 Amps | Up to approximately 200 Ah | Lighting, larger water pump, larger refrigerator (12V), microwave, air conditioner (depending on AC unit draw) | Suitable for larger travel trailers with more significant electrical demands. |
| 150 Amps | Up to approximately 300 Ah or more | All of the above, plus multiple high-draw appliances, larger air conditioner. | Ideal for large travel trailers with extensive electrical systems and multiple batteries. Often used in setups with solar panels. |
Choosing Between Types of Battery Switches
Several types of battery switches are available, each with its own advantages and disadvantages. The most common types are manual switches, remote switches, and automatic switches. Manual switches are the simplest and most affordable, requiring manual operation to connect or disconnect the battery. Remote switches offer convenience, allowing you to control the battery from a central location inside the trailer.
Automatic switches automatically connect and disconnect the battery based on voltage levels or other pre-set parameters. The best choice depends on your budget, desired level of convenience, and technical expertise. For example, a manual switch is suitable for a simple setup with a small battery bank and minimal electrical demand, while a remote switch might be preferable for a larger, more complex system.
An automatic switch offers the ultimate convenience, but may be more costly.
Calculating Total Amperage Draw
To determine the appropriate amperage rating for your battery switch, carefully add the amperage draw of each appliance connected to your battery bank. Remember to consider both continuous and surge currents. For example, if your refrigerator draws 10 amps continuously and 20 amps during startup, you need a switch that can handle at least 20 amps. Always round up to the nearest higher amperage rating for a safety margin.
A 50-amp switch would likely be inadequate for a system with a 45-amp total draw, especially if several high-current appliances are running simultaneously. Always factor in a safety margin to prevent overheating and failure.
Safety Precautions When Working with Battery Switches
Working with batteries and electrical systems in your travel trailer requires caution. Improper handling can lead to serious injury, including burns, explosions, and electrical shock. Always prioritize safety when dealing with your battery switch and related components. This section Artikels crucial safety measures to protect yourself and your equipment.
Battery switches, while seemingly simple, control significant electrical power. Incorrect handling or installation can create dangerous situations, from short circuits causing fires to accidental shocks leading to injury. Understanding and following proper safety procedures is paramount to prevent these hazards.
Disconnecting Batteries Before Maintenance or Repairs
Before undertaking any maintenance or repairs on your battery switch or related electrical components, it is absolutely essential to disconnect the batteries completely. This prevents accidental shorts and protects you from potentially lethal electrical currents. First, turn off any and all powered devices connected to the battery system. Then, using insulated tools, disconnect the negative (-) terminal first. This is crucial because it breaks the circuit ground, minimizing the risk of accidental sparks or shocks.
After disconnecting the negative terminal, then disconnect the positive (+) terminal. Remember to clearly label the terminals before disconnecting them to avoid confusion during reconnection.
Working with Insulated Tools and Protective Gear
Always use insulated tools when working with batteries and electrical systems. These tools provide a barrier between you and the electrical current, reducing the risk of shock. Furthermore, wearing appropriate personal protective equipment (PPE) is crucial. This includes safety glasses to protect your eyes from potential sparks or acid splashes, gloves to prevent acid burns, and closed-toe shoes to protect your feet.
Consider using a face shield for added protection against acid splashes, especially when working with older batteries that might be leaking.
Preventing Sparks and Avoiding Flammable Materials
Batteries produce hydrogen gas, which is highly flammable and explosive. Avoid sparks or open flames near batteries. This includes refraining from smoking, using power tools that might spark, or operating any equipment that could generate a spark. Keep the area well-ventilated to prevent the accumulation of hydrogen gas. Also, avoid working near flammable materials like gasoline or propane tanks.
A simple spark can ignite these materials, leading to a serious fire.
Proper Handling of Battery Acid
Battery acid is corrosive and can cause severe burns. If you spill battery acid, immediately neutralize it with baking soda and then clean the area thoroughly with water. If acid comes into contact with your skin, flush the affected area with plenty of water for at least 15 minutes and seek medical attention. Always wear appropriate eye and skin protection when handling batteries or working near them.
Properly dispose of used batteries according to local regulations; never throw them in the trash.
Understanding Electrical Symbols and Diagrams
Before starting any work, thoroughly review your travel trailer’s wiring diagram. Understanding the electrical symbols and the flow of current is essential to avoid accidental connections and potential hazards. If you are unsure about any aspect of the electrical system, consult a qualified electrician. Improper wiring can lead to shorts, fires, and serious injury.
Advanced Battery Switch Configurations
Upgrading your travel trailer’s battery system beyond a simple on/off switch opens up a world of convenience and control. Advanced configurations offer features that significantly improve the user experience and provide better monitoring of your power resources. These systems often incorporate remote control and sophisticated monitoring capabilities, allowing for greater flexibility and peace of mind.Modern battery switches are evolving beyond simple mechanical toggles.
Remote control functionality allows you to switch your batteries on or off from a distance, eliminating the need to crawl under your trailer every time you need to change the power source. Monitoring capabilities, often integrated with smart technology, provide real-time data on battery voltage, current draw, and state of charge, allowing you to proactively manage your power consumption and prevent unexpected battery drain.
Remote Control Battery Switches
Remote control battery switches offer the convenience of controlling your battery system from inside your travel trailer, or even remotely using a smartphone app in some advanced setups. This eliminates the need to access the battery compartment, especially useful in inclement weather or when the battery is located in a difficult-to-reach spot. The control mechanism can be a simple wired remote switch or a more sophisticated wireless system integrated with a larger control panel or smart home system.
A wired system might use a simple push-button switch with a cable connecting it to the battery switch. A wireless system, on the other hand, could use Bluetooth or Wi-Fi communication, allowing for control via a smartphone app. This offers significant advantages in terms of accessibility and ease of use. The drawback is the increased cost and complexity compared to a standard manual switch.
Battery Monitoring Systems
Integrated battery monitoring systems provide crucial information about the health and performance of your batteries. These systems typically display voltage, amperage, and state of charge, offering a clear picture of your power reserves. Some advanced systems even provide estimations of remaining runtime based on current power consumption. This predictive capability is invaluable for planning power usage and preventing unexpected power outages.
The benefits include improved battery management and extended battery lifespan through proactive monitoring. A potential drawback is the initial cost of a comprehensive monitoring system. However, the value in preventing premature battery failure often outweighs this cost.
Smart Technology Integration
The integration of smart technology with battery switches represents the cutting edge of RV power management. Smart battery monitors often connect to a smartphone app, providing remote access to battery data and control over the switching system. Some systems also incorporate features like load shedding (automatically disconnecting non-essential loads when the battery reaches a low state of charge) and solar panel integration, optimizing power usage and maximizing the utilization of renewable energy sources.
The advantages of this integration include enhanced convenience, proactive power management, and the potential for significant energy savings. The complexity of setup and potential compatibility issues with different systems represent the main drawbacks. However, the growing market for these technologies is driving improvements in both ease of use and interoperability.
Mastering your travel trailer’s battery switch isn’t just about keeping the lights on; it’s about ensuring a safe and enjoyable RV experience. By understanding the different types of switches, their functions, and potential troubleshooting steps, you can confidently manage your power, prevent costly repairs, and extend the life of your battery system. So, get out there and explore with peace of mind, knowing you’ve got the power under control!
Quick FAQs
What happens if my battery switch fails?
A failed switch might prevent you from accessing one or both batteries, leaving you without power. Symptoms include dead batteries despite charging, or inability to power certain appliances.
How often should I clean my battery switch terminals?
Inspect and clean your terminals at least twice a year, or more frequently if you notice corrosion or performance issues. A clean connection is vital for reliable power.
Can I use a battery switch with solar panels?
Yes, but proper wiring is crucial. You’ll need to ensure your solar charge controller is wired correctly to prevent backfeeding and potential damage.
What size battery switch do I need?
The amperage rating of your switch should exceed the total amperage draw of your appliances. Consult your RV’s electrical diagram or a qualified technician for guidance.
